Pin it
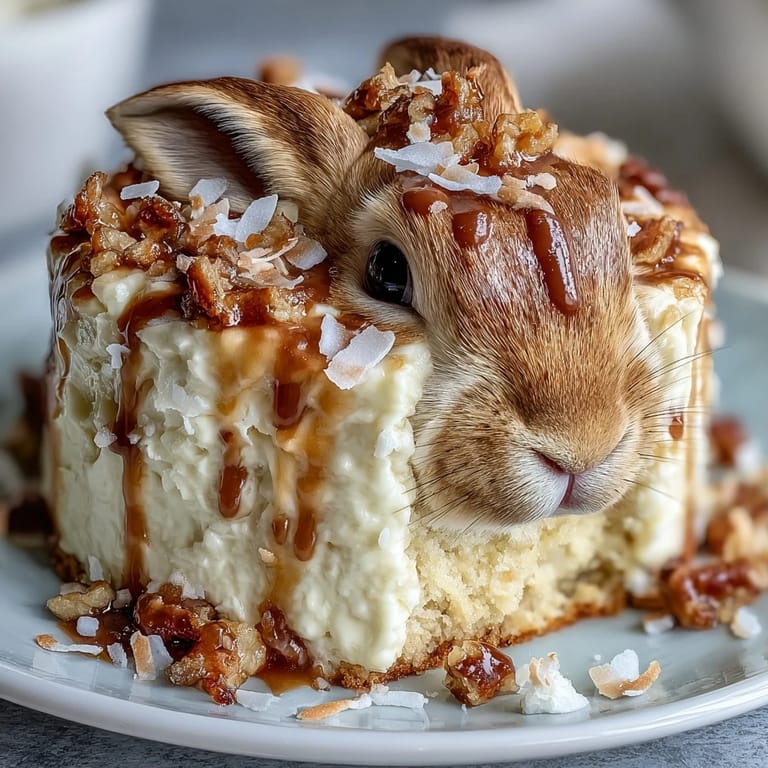
 My daughter came home from school talking about nothing but Easter, and suddenly I had this vision of a bunny cake that would make her eyes light up at the dinner table. I'd never shaped a cake like this before, but there was something about the challenge that felt right for the season. That first attempt taught me that a bunny doesn't need to be perfect to be magical, especially when you're building it with a child hovering nearby, offering running commentary on ear proportions and whether the nose looked friendly enough.
I'll never forget frosting this bunny with my nieces gathered around the kitchen island, each one convinced they should be the one wielding the spatula next. The moment we pressed that warm gold glitter onto the buttercream, the whole cake started catching light like it had come alive. It became this shared creation, something that felt bigger than just dessert because everyone's fingerprints were somehow in it.
Ingredients
- All-purpose flour: Use 2 ½ cups sifted for a lighter crumb; lumpy flour makes the cake dense and that's heartbreaking when you've shaped it into a bunny.
- Baking powder: Fresh baking powder matters here; check the expiration date because stale leavening agents won't give you that tender rise.
- Unsalted butter: Room temperature is non-negotiable for creaming with sugar; cold butter won't incorporate air and you'll lose that signature fluffiness.
- Granulated sugar: 2 cups creates the right sweetness balance without overwhelming the vanilla flavor that keeps people coming back for another slice.
- Large eggs: Room temperature eggs blend smoothly into the batter; cold eggs will seize the mixture and create a grainy texture you can't fix.
- Pure vanilla extract: The real deal makes a difference you can actually taste, especially in a simple vanilla cake where vanilla is the star.
- Whole milk: Adds moisture and tenderness; don't skip this or substitute with water.
- Powdered sugar: Sift it before adding to the buttercream or you'll have grainy frosting no matter how long you beat it.
- Sweetened shredded coconut: This becomes the bunny's fur and it's honestly the most forgiving texture for covering imperfect frosting.
- Pink gel food coloring: Gel holds its color better than liquid and won't thin out your buttercream or coconut mixture.
- Marshmallows: Large ones work as cheeks, mini ones become teeth; they're surprisingly sculptural if you think of them that way.
- Black licorice or gel icing: Creates whiskers and eyes that give your bunny actual personality and presence.
- Gold sprinkles: The finishing touch that transforms cake into celebration; don't be shy with them.
Tired of Takeout? 🥡
Get 10 meals you can make faster than delivery arrives. Seriously.
One email. No spam. Unsubscribe anytime.
Instructions
- Set your stage:
- Preheat the oven to 350°F and grease both 9-inch pans with butter, then dust with flour so nothing sticks. You want everything ready before you touch that batter because once you start mixing, you're committed.
- Build the dry foundation:
- Whisk flour, baking powder, and salt together in a bowl; this distributes the leavening evenly so every bite rises the same way. Lumps in this mixture are your enemy, so actually take a moment to make sure it's smooth.
- Cream butter and sugar:
- Beat them together for 3 to 4 minutes until the mixture looks pale and fluffy, like you're making actual clouds in a bowl. This aerating step is where the cake gets its tender texture, so don't rush it or skip straight to adding eggs.
- Add eggs thoughtfully:
- Drop in one egg at a time, beating well between additions until each one disappears into the mixture before the next one arrives. This slow incorporation makes the batter creamy instead of separated and grainy.
- Alternate and integrate:
- Start with some dry mixture, then milk, then dry again, always ending with dry mixture; this prevents overmixing and keeps the cake tender. Fold gently once everything's combined because overworking gluten is how you end up with cake that tastes like a sponge.
- Fill and bake:
- Divide the batter evenly between pans and slide them into the oven for 30 to 35 minutes until a toothpick comes out clean. You'll smell the vanilla first, then a deeper cake smell, and that's when you know you're close.
- Cool with patience:
- Let cakes sit in their pans for 10 minutes to set slightly, then turn them out onto racks to cool completely; rushing this step causes cracking. I know waiting is hard, but warm cake crumbles and that makes frosting a nightmare.
- Whip the frosting:
- Beat softened butter until it's creamy, then gradually add sifted powdered sugar with milk, vanilla, and salt until you have something thick and spreadable. Taste it and adjust vanilla if it feels one-note; buttercream is forgiving that way.
- Assemble the bunny:
- Place one cake round as the face, cut two ovals from the second round for ears, and arrange everything on a large platter to form a bunny shape. This is where the cake becomes a character and not just a cake.
- Apply the crumb coat:
- Spread a thin layer of frosting over the whole thing and chill for 20 minutes so loose crumbs don't get pulled into your final frosting. This step feels unnecessary until you skip it and end up with a speckled bunny that looks diseased.
- Frost generously:
- Apply a thick, even layer of buttercream over the entire bunny shape, creating texture and dimension with your spatula. Don't aim for perfection here; a little rustic texture makes the bunny feel friendlier.
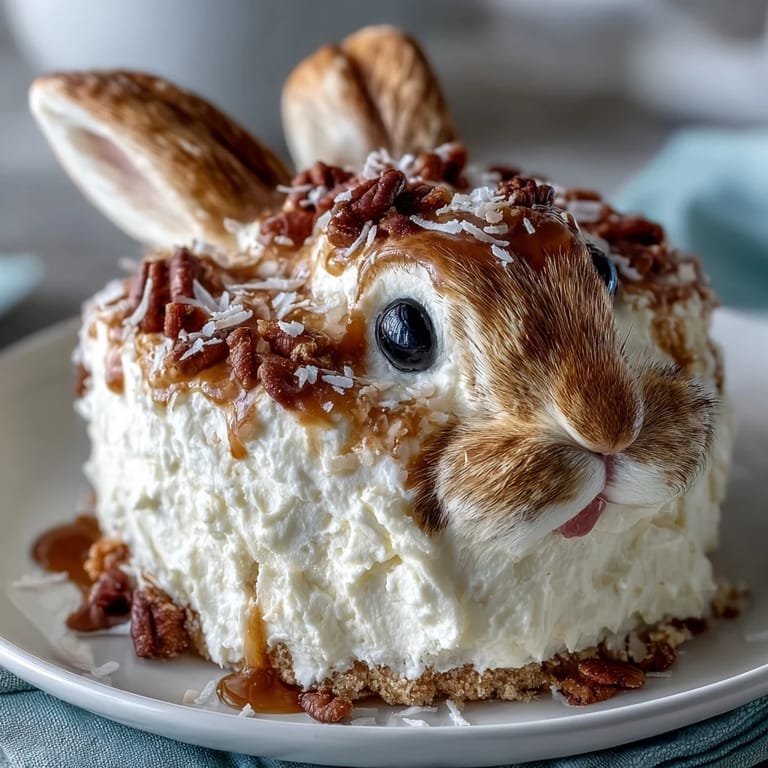
- Add the fur:
- Press shredded coconut onto all the frosted surfaces while the buttercream is still slightly tacky so it sticks without sliding around. This is deeply satisfying and also covers up any frosting imperfections you're worried about.
- Pink the details:
- Tint a small handful of coconut with pink food coloring by adding a tiny drop of gel and rubbing it through with your fingers until it's evenly tinted. Use this for the inner ears and nose area to add subtle color without looking garish.
- Place the marshmallow features:
- Press large marshmallows onto the face for cheeks and use mini ones for a smile of teeth; they stick to buttercream beautifully. The asymmetry of marshmallows is actually charming.
- Draw on the personality:
- Use black licorice laces to create whiskers and eyes, or pipe them with black gel icing if you're comfortable piping. This is the moment the bunny actually comes alive and gets its personality.
- Sparkle and finish:
- Shower the bunny with gold sprinkles, pressing some gently into the frosting so they stick and catch light from every angle. Step back and admire what you've created because this moment matters.
 Pin it
 What struck me most wasn't the taste, though the cake was genuinely soft and buttery and worth eating. It was watching my daughter take a photo of her bunny before cutting into it, treating it like a friend she was about to say goodbye to.
The Bunny Assembly Moment
The shape matters more than you think because suddenly it's not cake, it's a character with personality and presence. I've made round cakes a hundred times without thinking twice, but the minute you cut one into ears and arrange them just so, something shifts in how people receive it. That bunny on the platter isn't just dessert anymore; it's a centerpiece, a conversation starter, a reason people pause before diving in.
Frosting as the Foundation
The buttercream in this recipe is thick and stable enough to hold the coconut without sliding, but still soft enough to spread without fighting you. I learned this the hard way by making buttercream too thin, watching the coconut slide off in clumps, and feeling genuinely frustrated with myself. The ratio of butter to sugar matters; too much sugar makes it grainy, too little makes it greasy, but this balance is reliable every single time.
Customization and Texture Play
The gold sprinkles feel celebratory, but honestly the coconut is what makes this cake memorable because it adds this unexpected texture. You can switch the sprinkles for edible glitter, pearl dust, or even skip them if you want; the bunny works either way. The marshmallows and licorice are flexible too, so adapt based on what feels right to you and what you actually have in your pantry.
- Chocolate lovers can replace half a cup of flour with unsweetened cocoa powder for a richer bunny with the same shape and charm.
- Gold leaf or edible gold dust creates extra shimmer if you're feeling fancy, though regular sprinkles honestly do the job just fine.
- Store leftovers covered at room temperature for two days or refrigerated for up to five days if somehow anyone doesn't eat it immediately.
 Pin it
 This bunny cake became the kind of dessert that people remember long after the last bite, and that's worth the effort. Make it, enjoy the assembly, and don't worry about perfection because imperfect bunnies have more soul anyway.
Recipe Questions & Answers
- → What type of flour is used in this cake?
All-purpose flour is used to create a tender crumb suitable for the moist texture of this cake.
- → How is the bunny shape formed?
The cake rounds are cut and arranged to form the bunny's face, ears, and bowtie, then decorated accordingly.
- → What gives the cake its moist texture?
The combination of butter, eggs, milk, and careful mixing results in a moist and tender cake.
- → How are the gold sprinkles applied?
Gold sprinkles are gently pressed onto the buttercream-coated cake as the final decorative touch.
- → Can the frosting be tinted for decoration?
Yes, a portion of shredded coconut is tinted with pink food coloring for the bunny's ears and nose.
- → What alternatives can be used for extra shimmer?
Gold leaf or edible gold dust can replace sprinkles to enhance sparkle and elegance.