 Pin it
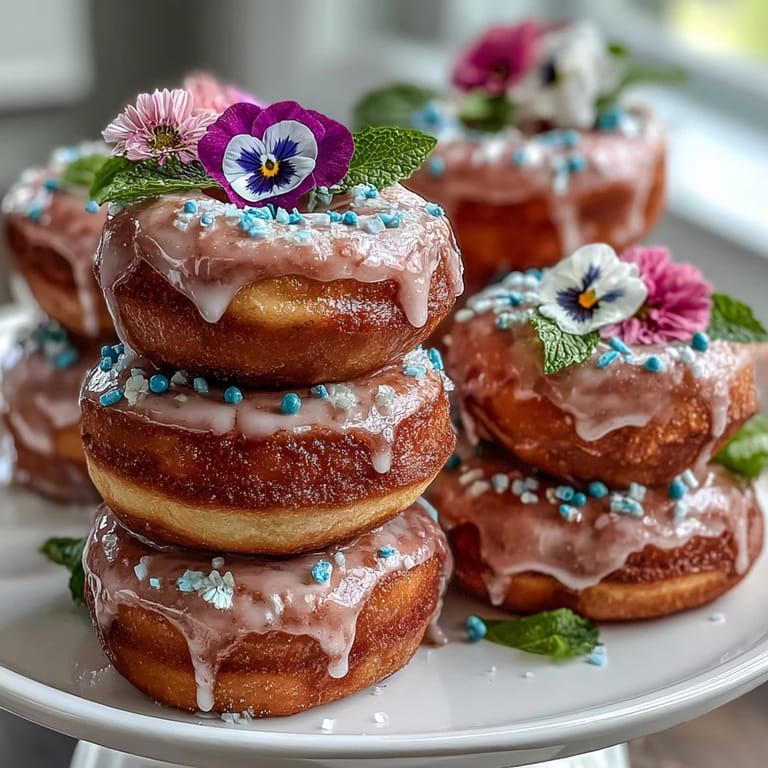
 Last spring, I found myself standing in a baby shower venue with zero dessert ideas and forty-five minutes to solve it. A friend mentioned she'd grabbed mini donuts from the bakery as a backup, and that's when it clicked—what if I stacked them like flowers themselves? The vision came together so fast I almost didn't believe it would work, but watching guests light up when they saw this tower of pastel-glazed donuts crowned with real flowers made every second of setup worthwhile.
I've made this tower three times now, and each time it's become the centerpiece that actually gets eaten instead of just admired. At my cousin's baby shower, a few guests asked if they could take the whole tower home because their kids refused to believe they could eat something so pretty. That's when I realized this isn't just dessert—it's a conversation starter.
Ingredients
- Mini donuts (36–40): Buy these fresh from a bakery counter if you can; they taste infinitely better than packaged and come in way more interesting flavors like maple, cinnamon sugar, or even lemon.
- Powdered sugar (1 cup): This is your glaze base, and sifting it first prevents lumps that could make your coating grainy.
- Milk or water (2–3 tbsp): Start with 2 tablespoons and add gradually until you reach that pourable but clinging consistency.
- Vanilla extract (1/2 tsp, optional): A small touch that rounds out the sweetness without overwhelming the delicate donut flavor.
- Food coloring (pastel preferred): Gel colors work better than liquid if you want true pastels without thinning your glaze too much.
- Sprinkles (1/4 cup rainbow or pastel): These stick best to glaze that's still slightly wet, so work quickly after dipping.
- Edible flowers (1 cup): Violets, pansies, and nasturtiums are foolproof choices; verify they're pesticide-free and labeled safe for eating.
- Fresh mint leaves (optional): These add a bright green pop and smell incredible, but they wilt quickly so add them just before serving.
- Foam cone (10–12 inches) or tiered stand: The foam cone creates that dramatic tower shape, but a cake stand works beautifully if you prefer a more structured look.
- Toothpicks or wooden skewers: Soak wooden skewers in water for ten minutes if you have time; they're sturdier than toothpicks for holding donuts in place.
Tired of Takeout? 🥡
Get 10 meals you can make faster than delivery arrives. Seriously.
One email. No spam. Unsubscribe anytime.
Instructions
- Mix your glaze:
- Whisk powdered sugar with milk until smooth and creamy, then add vanilla and a whisper of food coloring if you want pastels. The consistency should coat the back of a spoon but still drip slightly.
- Glaze and decorate:
- Dip each donut's top into the glaze, let excess drip off for a second, then immediately sprinkle while the coating is still tacky. Lay them on parchment to set for at least fifteen minutes—this prevents the glaze from sliding off as you build.
- Prep your base:
- Set your foam cone on a serving platter that's sturdy enough to handle the weight of thirty-six donuts without tipping. If the cone seems wobbly, secure it with a small dot of hot glue on the underside.
- Start stacking:
- Beginning at the bottom, insert toothpicks or skewers at slight angles and slide donuts onto them, overlapping as you spiral upward like you're building a delicious tower of feathers. Work from bottom to top so you don't accidentally nudge lower donuts.
- Tuck the flowers:
- Slide edible flowers and mint leaves into the gaps between donuts, turning them so the pretty side faces outward. Step back and look for any bare foam showing through—those spots are where you need more flowers.
- Final touches:
- Sprinkle extra pastel sprinkles or tiny flowers into any remaining gaps, and add a small bouquet of flowers to the top of the cone for drama. This tower can sit for up to four hours covered loosely with plastic wrap if your fridge has room.
 Pin it
 The magic of this tower happens the moment someone realizes those flowers are actually edible. I watched a little girl at the shower reach up, pluck a violet from between two donuts, and pop it in her mouth with this expression of pure wonder—like she'd discovered something nobody had ever thought of before. That's what this dessert does.
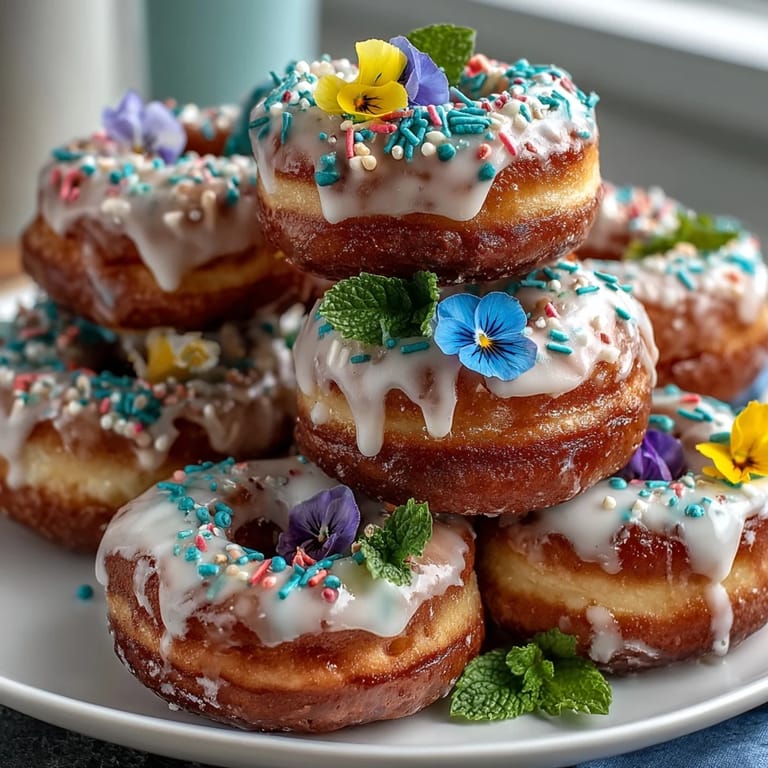
Picking Your Donuts
The best towers come from mixing flavors and sizes strategically. I usually do about half glazed plain (these are your neutral anchors), a quarter cinnamon sugar (adds warmth), and a quarter fun flavors like maple or lemon. Slightly smaller donuts tuck into gaps beautifully, so don't feel like you need them all the same size—that variation actually makes the whole thing look more organic and charming.
Making It Baby Shower Perfect
The pastels are already soft and springlike, so you're halfway there theme-wise. If you want to lean harder into baby vibes, add small fondant toppers shaped like rattles or baby carriages, or swap the edible flowers for baby's breath mixed with the colorful ones. Light blue or blush pink glazes feel especially shower-appropriate without being heavy-handed.
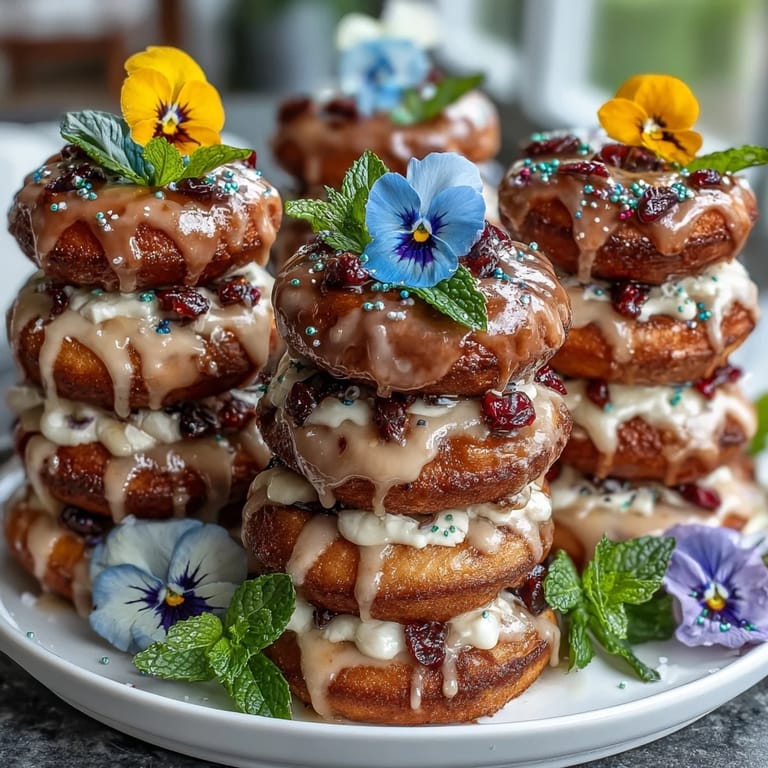
Timing and Storage Secrets
Build this tower no more than two hours before serving if it's warm outside; the glaze stays crisp longer in cool conditions, but the donuts themselves can dry out if they sit too long uncovered. The foam cone is structural gold, but if you're nervous about the whole thing toppling during transport, build it at the venue instead of trying to move it—most baby shower hosts are thrilled to let you commandeer a corner of their kitchen for thirty minutes.
- Mint wilts visibly within an hour of being added, so add those leaves as late as possible.
- If you're making this the night before, assemble it completely but skip the mint and add it fresh right before guests arrive.
- A gentle sheet of plastic wrap draped loosely over the tower (not touching) buys you a few extra hours in the fridge.
 Pin it
 This tower has a way of turning what could've been ordinary dessert into a moment people actually remember. Build it with the same care you'd give to arranging fresh flowers, and watch how something so simple becomes the highlight of the celebration.
Recipe Questions & Answers
- → What type of donuts work best for the tower?
Mini glazed or assorted flavor donuts offer variety and natural sweetness, ideal for layering and decorating.
- → How do I attach the donuts securely to the tower?
Use toothpicks or wooden skewers to pin the donuts onto a foam cone or tiered stand, ensuring stability in overlapping layers.
- → Which flowers are safe to use for decoration?
Choose edible flowers like violets, pansies, nasturtiums, or marigolds that are pesticide-free and suitable for consumption.
- → Can I prepare the tower in advance?
The assembled donut tower can be covered loosely and refrigerated up to 4 hours before serving to maintain freshness.
- → How is the glaze made for the donuts?
A simple glaze mixes powdered sugar with milk or water and vanilla; adding food coloring creates pastel shades for decoration.