 Pin it
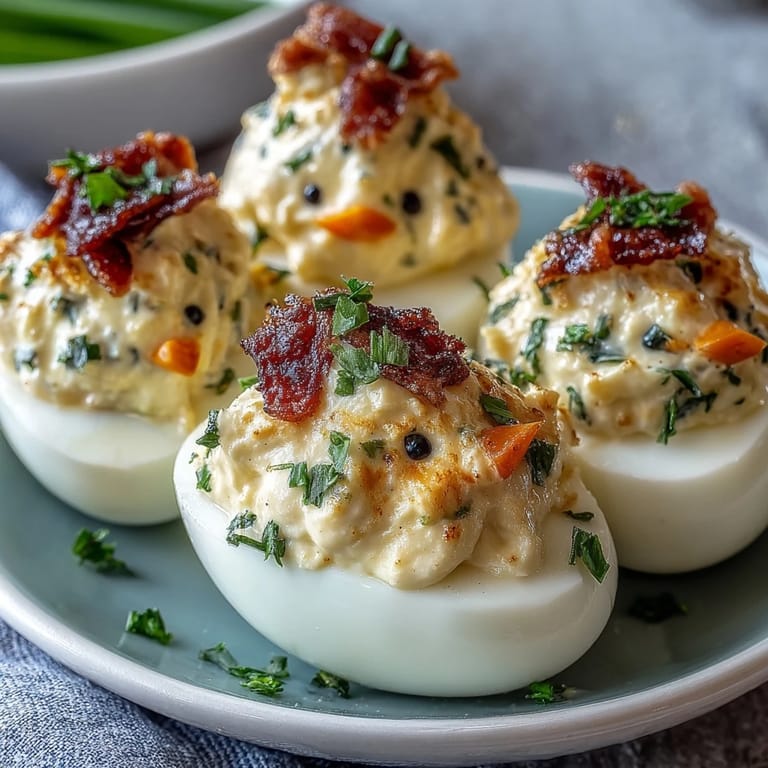
 There's something irresistibly charming about transforming a classic deviled egg into an adorable baby chick that brings smiles to every Easter table. These Deviled Egg Chicks combine the beloved creamy, tangy filling we all crave with a playful presentation that delights both kids and adults alike. With their tiny carrot beaks, peppercorn eyes, and jaunty egg white caps that look like they're just hatching, these little chicks are almost too cute to eat—almost. Perfect for spring brunches, Easter gatherings, or any celebration that calls for a touch of whimsy, this recipe proves that food can be both delicious and delightful.
Pin it The beauty of these Deviled Egg Chicks lies in their simplicity. While they look like they require advanced culinary skills, the technique is straightforward and forgiving. The hard-boiled eggs provide a stable base, and the creamy yolk filling—enriched with mayonnaise, mustard, and a hint of vinegar—delivers that signature deviled egg tang we all crave. The decoration is where the magic happens: tiny carrot triangles become beaks, peppercorns transform into bright eyes, and the angled egg white caps create the illusion of chicks pecking their way into the world. It's a recipe that invites creativity and guarantees compliments.
Ingredients
Tired of Takeout? 🥡
Get 10 meals you can make faster than delivery arrives. Seriously.
One email. No spam. Unsubscribe anytime.
- Eggs: 12 large eggs
- Filling: 3 tablespoons mayonnaise, 1 teaspoon yellow mustard, 1 teaspoon white vinegar, ¼ teaspoon salt, ⅛ teaspoon ground black pepper
- Decoration: 24 whole black peppercorns (for eyes), 1 medium carrot (for beaks and feet), Optional: fresh chives or parsley for garnish
Instructions
- Step 1: Boil the Eggs. Place eggs in a single layer in a large saucepan and cover with cold water. Bring to a boil over medium-high heat. Once boiling, cover, remove from heat, and let stand for 10 minutes.
- Step 2: Cool the Eggs. Transfer eggs to a bowl of ice water and let cool completely, about 5 minutes.
- Step 3: Peel and Dry. Gently peel the eggs and pat dry.
- Step 4: Create the Base and Cap. For each egg, slice a small portion off the bottom so the egg stands upright. Slice off the top 1/3 of the egg (horizontally) to create a cap.
- Step 5: Separate Yolks. Carefully remove yolks and transfer to a bowl. Place egg whites on a serving tray.
- Step 6: Make the Filling. Mash yolks with mayonnaise, mustard, vinegar, salt, and pepper until smooth and creamy.
- Step 7: Fill the Egg Whites. Using a spoon or piping bag, fill the bottom egg whites with the yolk mixture, mounding it slightly to form the chicks head.
- Step 8: Add the Caps. Place the egg white caps back on at a jaunty angle to resemble a chick hatching.
- Step 9: Create Beaks and Feet. Cut tiny triangles from the carrot for beaks, and small slivers for feet. Gently press the beaks and feet into the yolk mixture.
- Step 10: Add Eyes. Add two black peppercorns for eyes on each chick.
- Step 11: Garnish and Serve. Garnish with fresh chives or parsley if desired. Serve chilled.
Zusatztipps für die Zubereitung
For perfectly boiled eggs that peel easily, use eggs that are at least a week old rather than fresh ones. The ice bath after boiling not only stops the cooking process but also helps separate the membrane from the egg white, making peeling much smoother. When creating the flat bottom, slice just enough to make the egg stable without removing too much white. A piping bag fitted with a star tip creates beautiful swirls for the filling, but a simple spoon works just as well for a more rustic look. When cutting the carrot decorations, use a sharp paring knife and cut very thin pieces—they're easier to insert and look more delicate. If the carrot pieces won't stay in place, use a toothpick to create a small hole first, then gently press the decoration in.
Varianten und Anpassungen
For a lighter version, swap the mayonnaise for Greek yogurt, which adds a pleasant tang and reduces calories. If you prefer a spicier kick, add a dash of hot sauce or a pinch of cayenne pepper to the yolk mixture. For softer eyes that are easier to eat, use small pieces of black olives instead of peppercorns. You can also get creative with the decorations: use thinly sliced radish for pink accents, add paprika for a dusting of color, or use different colored bell peppers for varied beak colors. For a more sophisticated flavor profile, fold in finely chopped fresh herbs like dill, chives, or tarragon into the yolk mixture. Some cooks like to add a touch of Dijon mustard instead of yellow mustard for a more complex flavor, or incorporate a small amount of pickle relish for extra zing.
Serviervorschläge
These Deviled Egg Chicks shine as the centerpiece of an Easter brunch spread or spring celebration. Arrange them on a bed of fresh greens or shredded lettuce to create a nest-like presentation. For an extra festive touch, scatter colorful jelly beans or chocolate eggs around the serving platter. They pair beautifully with fresh fruit salads, hot cross buns, glazed ham, and other traditional Easter fare. If serving at a children's party, consider setting up a decorating station where kids can add their own creative touches with various vegetable pieces and edible decorations. For adult gatherings, serve alongside sparkling wine or mimosas. These chicks are best served chilled and can be refrigerated for up to one day before serving, making them an ideal make-ahead appetizer that frees you up to focus on other dishes.
 Pin it
 These Deviled Egg Chicks are more than just an appetizer—they're a conversation starter, a smile-maker, and a delicious reminder that cooking can be playful and fun. Whether you're creating them for a holiday celebration or simply to brighten a regular weekend, the combination of classic deviled egg flavor and charming presentation makes them an instant hit. So gather your ingredients, invite the kids to help with the decorating, and watch as these adorable little chicks bring joy to your table. They prove that sometimes the simplest recipes, when presented with a touch of creativity, become the most memorable.
Recipe Questions & Answers
- → How do I make the filling smooth and creamy?
Mash the yolks thoroughly with mayonnaise, mustard, vinegar, salt, and pepper until the texture is uniform and creamy for easy piping.
- → What is the best way to peel the eggs without damaging them?
After boiling, cool eggs in ice water to stop cooking and make peeling easier; gently tap and peel under running water for best results.
- → Can I prepare these in advance?
Yes, assemble the chicks and refrigerate them covered for up to one day to maintain freshness and flavor.
- → What can I use as alternatives for decoration eyes?
Black olive pieces work well as softer eyes instead of peppercorns and are easier to bite into.
- → Are there any ingredient substitutions for a lighter filling?
Greek yogurt can replace mayonnaise for a lighter, tangier filling without compromising creaminess.